1 meter of angle made of white plastic : 10 x 10 mm.
1 tube of colourless silicone glue.(Loctite)
1 pistol for silicone tube.
1 elastic band.
1 stone to sharpen with oil.
1 strap and wooden corners.
Some advice :
If your panes haven't been ground, prepare them by getting rid of the sharp edges with a stone to sharpen. (to prevent you from cuts)
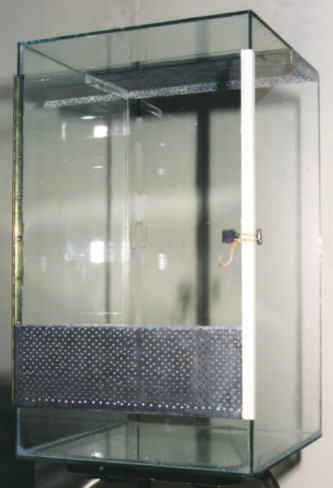
Stick the pane of the back on the one of the bottom : the whole thing standing on a chair.
Then stick the 2 panes of the sides : the back holding the pane of the back.
Stick the skirting board of the bottom, and seize slighty the whole thing sliding corners between the strap and the panes of the side.
The day after, put the pane of the top on a table and glue the edges.
Put the assembly upside down on this new base to close the terrarium and stick the second skirting board which will be a support for the top.
Wait for 48 hours before getting rid of the extra glue with a cutter : try not to smooth the silicone. (personal view of the author for esthetic)
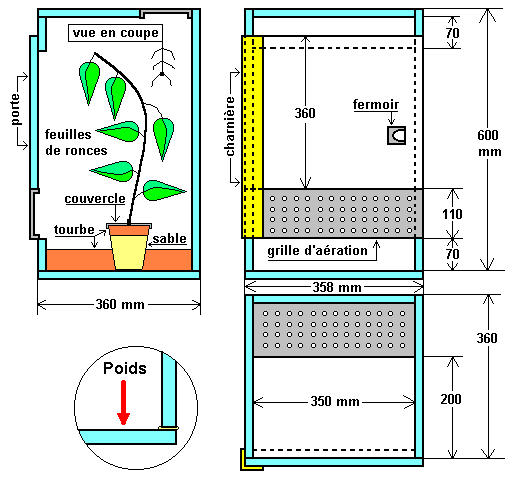
Cut your vent and to forget to add to it edges, folded with a square, about 5 mm, so that your vent can be perfectly built in and glued in the top.
As the vent of the door, it will have a edge folded on itself on the hinge side, to adapt the glass thickness when it's closed.
The hinge fixing shouldn't be a matter if you present properly the door on the terrarium lying down.
The 2 claps have been made with inox offcut and folded in the shape of a hook, to enable us to put an elastic band round. Which will maintain the door closed.
The plastic angle enables the fixation of the vent on the door, it may as well prevent it from any awkwardness !
Don't forget silicone's got a big resistance to the pulling and not to the chiselling. (see the diagram)
Explanations :
When I asked a colleague, Christophe the entomologist, to explain to me the assembling of his terrariums, I certainly didn't think I was going to attend a fast lesson about the breeding of phasmes. I did attend it though !
Prepare some blond peat in a bucket by moistening it with water, and leave it to rest for 48 hours.
Put the peat at the bottom of the terrarium (height : 5 cm) and wait for the ecosystem to start. (about 1 month)
Full in an empty honey pot of 500 g (for example) with some sand and peat, so that the water doesn't stagnate. Then make a 30 mm hole in the lid for the young not to fall in.
According to the grass-eating species you're breeding, you'll need brambles, oak, privet, rhododendron, eucalyptus, ivy, rose, fern, raspberry or hazel branches.
Although we find them especially in the South of France (Bacillus rossius et Leptynia hispanica), most of the phasmes (from the Latin Phasmatodea) come from Malaisia, Indonesia, Java, Australia, Peru, etc...
So you'll have to supervise the hygrometry degree as well as the temperature, and a heating string, thermo regulated, at the bottom of the terrarium will be needed to show on the thermometer a medium temperature : 23 degree C.
For the lighting use fluo tubes (18 w) and also the day light for at least a 12 hours cycle.
The incubation time goes from 3 to 12 months, and the lifetime goes from 3 months to 2 years. You 'll understand the breeding of phasmes has to be very seriously controlled.
And if adventure is a hobby for you as much as for Christophe the entomologist, who's already got 12 terrariums, you'll need a room especially made for the breeding of phasmes.
But there,.....we're talking about a professional's work !
Genre : Epidares mâle
Espèce : nolimetangere
Pays : Sarawak
Genre : Eurycantha femelle
Espèce : calcarata
Pays : Papouasie - Nlle Guinée
Genre : Extatosoma femelle
Espèce : tiaratum
Pays : Australie
Les photos de phasmes sont d' Eric BELLEVILLE.
Et pour en savoir plus sur les phasmes, visitez les sites de Bruno BIRON
et de Thierry LEFEUVRE