A halogen standard lamp for living room : 12 v - 50 w
Material :
3 aluminium tubes : 1 meter x 10 mm.
37 aluminium tubes : 150 mm x 10 mm.
4 aluminium discs : 150 mm x 8 mm.
1 hexagonal head screw : 4 x 50 mm.
2 wings nuts : 4 mm.
4 threaded rods : 4 x 165 mm.
4 nuts : 4 mm.
1 countersink screw : 5 x 15 mm.
4 hexagonal head screws : 4 x 15 mm.
1 transformer 220 v - 12 v - 160 v-amp.
1 porcelain connecting block with 3 connections.
1 halogen lamp 12 v - 50 w.
5 meter of electric cable : 2 x 1 mm².
1 plug 2 Poles - 250 v - 6 amp.
1 switch.
Advice :
Once you've found a 160 volts-amp transformer which is heavy enough to stabilize the standard lamp, you need to find speciallized worker to get correct 4 aluminium discs.
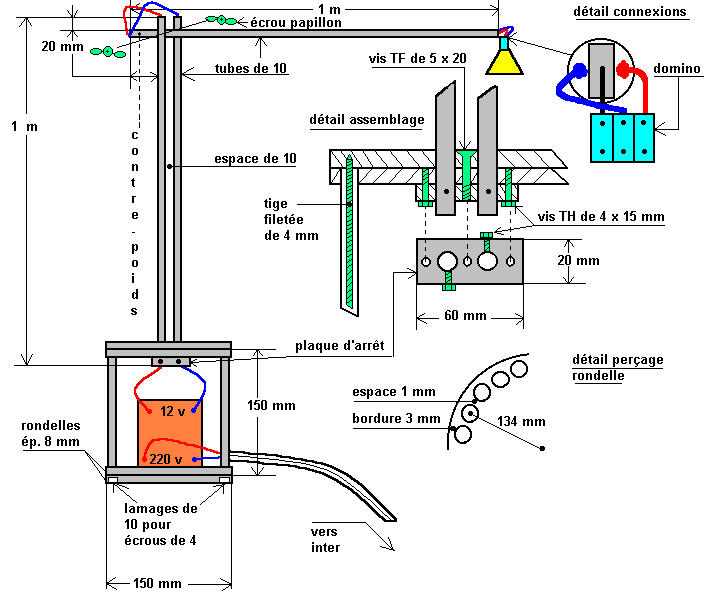
First of all, draw a diagram of a aluminium disc which will receive the 37 x 10 mm tubes and check the bulck of the transformer.
The radius of the circle is 134 mm and you need to have 1 mm space between each tubes, as well as 3 or 4 mm edge.
Once all the holes are located, locate the discs (bottom top), hold them by the central hole (diameter 5 mm) and start the drilling with a 3 mm drill, then 6 mm and 10 mm.
Provide several replacement drills because the first drillings need well sharpened angles of cut.
This work is quite long and tedious because you have to keep getting rid of the chips which hamper the drill, otherwise it might go out of its drilling axis. (the worse is that you don't notice it straight away)
Locate and drill 3,5 mm holes which will receive the 4 threaded rods arranged as a square on the top disc. (be careful : do not to through)
Hidden in the tubes, they will hold the whole thing.
Make 10 mm holes on the first aluminium disc to countersink the 4 mm nuts. (be careful : do not through)
Make a grip block in a aluminium offcut, as on the picture, to fix the 2 vertical tubes, which are 10 mm apart : so that they won't go down.
For the joint of the horizontal tube, which will be fixed the last one, a 4 mm hole will be drilled from 20 mm of each ends and the head of 4 x 50 mm screw will be saved off to be used as an axis with the wing nuts.
The cable, put on at first, has to be split into 2 enable the axis to go through.
Fixing the connecting block is more difficult because you need to force down a small aluminium square (thickness : 4 mm, 2 mm hole screwtapped) to receive a bent screw with a right angle. (see picture with details)
Put the whole thing together upside down and laid down flat.
Put the split into 2 cable in the vertical tubes, screw the 4 threaded rods, put the 37 tubes in their respective places, then put the remaining cable between 2 tubes which are enough apart, put together the 2 remaining discs and the transformer which is before hand fixed and wired. Hold the whole thing with the 4 mm nuts of 4, you'll have embedded in the holes with flat bottom.
Stick an adhesive light weight felt disc under the base.
Finish by sticking the articulated tube, by connecting the block and connecting the lamp on it. (take slightly apart the legs of the lamp if need be, but be careful it breaks easily !)
Options :
Even though you've tightened well the joint, the horizontal arm tend to go down, use a counter balance fastened to a nylon thread.
For a useful counter balance, the end of the tube has to stick out. (about 50 mm or more)
Stick a aluminium rivet's head on the central screw so that you can say there's no screwing on this lamp.
In this case, do not forget the method to calculate the intensity consumed by the transformer's ouput : Power (watt) = tension (volts) x intensity (amp), from which it may be concluded that, Intensity = Power/Tension.
Calculate it and use the second formula of electricians : 5 amp per mm².
Don't forget you work with 220 volts and conductor materials, so a connection to the earth is obligatory !


