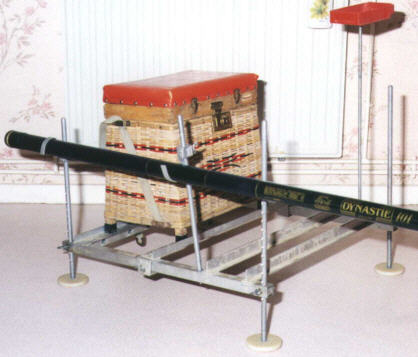
A floating platform to go fishing
Material :
2 aluminium square tubes : 25 x 650 mm.
1 aluminium square tube : 25 x 550 mm.
4 aluminium squares : 20 x 40 mm.
2 aluminium T shape sections : 30 x 30 x 600 mm.
2 aluminium angles with unequal wings : 40 x 20 x 600 mm.
2 aluminium square tubes : 40 x 40 mm.
1 aluminium tube : 8 x 530 mm.
2 aluminium rounds : 12 x 500 mm.
2 aluminium rounds : 12 x 430 mm.
2 aluminium rounds : 12 x 370 mm.
2 aluminium dishes : 140 x 15 x 2 mm.
4 teflon discs : 80 x 10 mm.
8 hexagonal heads screws : 8 x 20 mm.
8 wings nuts : 8 mm.
4 special heads screws : 6 x 20 mm.
4 special heads screws : 6 x 45 mm.
45 pop rivets : 4 x 15 mm.
1 rack.
Advice :
The most difficult thing will be to find the ideal sections in small quantity, because even if the shops specialized in aluminium work sell some they are, generally, 6 m long.
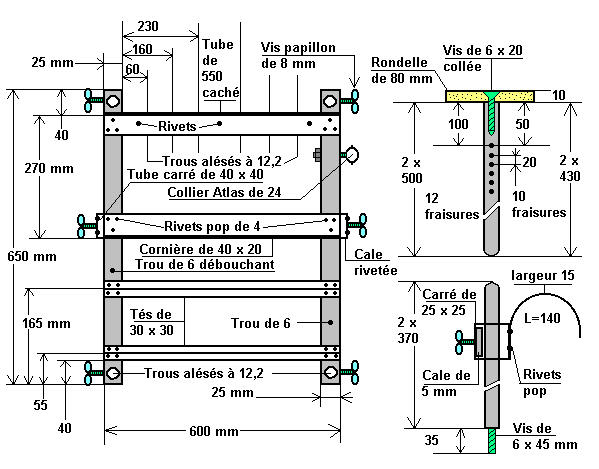
Once you've finished your shopping, start by fixing the 20 x 40 square in the ends of the 25 x 25 x 650 mm tubes.
You may need to adjust it a bit of glue (cyanolite glue) to fix it definitly.
To bore the 12 mm hole, go ahead slowly, in stages : 6 mm drills, then 8 mm, 10 mm, and 12 mm. The adjusting up to 12,2 mm will be done with a small round file.
Drill 6,5 mm holes and thread (8 mm) perpendicular to these holes to screw the wing screw. The wing screws : to get them you have to saw the 6 x 20 screws'heads and glue the screws in wing nuts.
The angles with unequal wings will support your fishing basket and T shape sections will be used as foot rest and even shoe scraper.
Be careful, the angle of the midle is adjustable and being out of alignement it will be rived on the square (40 x 40 mm) tubes.
Inside the square tube, a 5 mm riveted and threaded wedge will receive the 8 mm wing screw. This angle will be slide at the second position before you close the floating platform with the T sections.
You can definitely fix it by drilling the square tube (25 x 25 x 650). Be careful, do it only once the fishing basket is set up.
To make the fishing rods holder use 5 mm wedge which is threaded. Besides, this wedge has to adopt the 12 mm round shape for a better locking.
The half hoops (15 x 140 mm) will be folded on a round shape (you can choose). By the way, there are 2 types of aluminium : the one which folds and breaks, and the other one you can work well without any problems.
The 500 mm front legs and the 430 back ones have got thread on in order to block the wing screw and prevent you from a forced bath if the floating platform would tip up.
As for the discs (80 mm), which will prevent you from getting bogged down, will be fixed with 6 x 20 screws which are stuck.
A small box, kind of a rack, will be useful to put in worms and why not a tool to take out the hook.
Its bottom is crossed by a 6 x 45 screw which is blocked by a nut. This nut is slid in to the aluminium tube (8 x 530 mm), which is fixed in the floating platform by an identical screw.
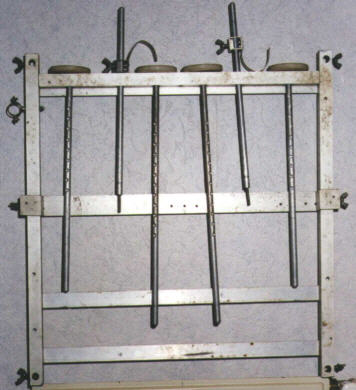
To tidy the legs and the fishing rods holders, a 25 x 25 x 550 mm square tube with six 12,2 holes is riveted under the first angle.
Here it is, you only need to do natural size tests and you'll understand what is the Atlas collar for. Good...(I don't say it !)
Options :
The aluminium tube (8 x 530 mm) will be tidied up in a 6 mm threaded hole, right in the midle of the 2 central discs.
Do not forget to grease, from time to time, the thread of the wing screws which block the legs, especially once the fishing season time is finished, it will prevent you from unpleasant surprised.